v1.6
 Midikey2Key Help & FAQ
Quickstart
Dies ist eine Kurzanleitung, um MidiKey2Key schnell einzurichten (für erfahrene Benutzer). Für mehr Details herunterscrollen für die ausführlichen Beschreibungen.
- Laded das MidiKey2Key Windows Installer - File von der Download-Seite herunter.
- Öffnet es mit einem Doppelklick und führt die Anweisungen des Wizzards aus.
- Verbindet ein Midi - Gerät mit Eurem PC (direkt über USB oder über ein Midi-Interface).
- Findet MidiKey2Key im Startmenü Ordner "Midikey2Key" und startet das Programm.
- Wählt Euer Midi - Gerät unter "Midi devices" aus.
- Aktiviert die Checkbox "Log To Window".
- Klickt auf "Start".
- Führt ein paar Aktionen auf Eurem Midi-Gerät aus (NoteOn - Events empfohlen).
- Prüft das Log - Fenster klickt doppelt auf ein Event (z.B. ein NoteOn - Event). Ein neues Fenster öffnet sich.
- Klickt in die blaue Input - Box
- Drückt eine Tastatur-Kombination auf Eurer PC - Tastatur (z.B. Strg-Alt-A)
- Klickt "Save".
- Fertig.
Jedes mal wenn Euer Midi - Gerät das gewählte Midi - Event auslöst, wird das Keyboard - Kommando ausgelöst.
Setzt den Keyboard - Befehl in dem Programm, welches Ihr steuern möchtet (z.B. OBS) auf die Funktion, die Ihr mit MidiKey2Key auslösen möchtet.
Installation
MidiKey2Key installieren
- Downloaded das MidiKey2Key Windows Installer - File. Der Download ist ein File, das "MidiKey2Key_vxxxx.msi" heißt.
- Navigiert zum Download und öffnet es mit einem Doppelklicklick.
- Folgt den Anweisungen des Wizzards.
- Das Setup - Programm installiert MidiKey2Key in C:\Programme (x86)\MidiKey2Key und erzeugt eine Verknüpfung zu MidiKey2Key im Startmenü in einem Unterordner "Midikey2Key".
- MidiKey2Key benötigt Microsoft .NET framework 4.0 oder höher. Windows 7 und höher sollten dies bereits installiert haben. Wenn Ihr unsicher seid, könnt ihr es hier herunterladen: https://www.microsoft.com/en-us/download/details.aspx?id=24872
- MidiKey2Key ist nun installiert.
- Note: Wenn MidiKey2Key zum ersten mal beendet wird, nachdem ein paar Einstellungen vorgenommen wurden, erzeugt es einen Ordner "Midikey2Key" in Eurem Dokumenten - Ordner. Das File settings.ini hält alle Programmeinstellungen, z.B. die letzte Fensterposition und alle programmierten Actions. Es ist nicht empfohlen, dieses File manuell zu editieren! Ihr könnt davon eine Sicherheitskopie machen, oder es auf einen anderen PC übertragen.
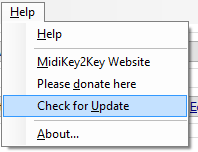
- Klickt "Check for Update" im Menü "Help".
- Wenn gemeldet wird, dass eine neuere Version verfügbar ist, MidiKey2key beenden.
- Öffnet die Download Seite und downloaded die neueste Version.
- Es ist nicht nötig, die alte Version zu deinstallieren. Einfach das heruntergeladene .msi File doppelklicken und den Anweisungen des Setup - Programms folgen.
- Wenn der Installationsvorgang abgeschlossen ist, kann MidiKey2key wieder gestartet werden.
- Öffnet in der Systemsteuerung "Programme und Features".
- Findet "MidiKey2Key" in der Liste, markiert es und wählt "Deinstallieren".
- Das Programm und seine Komponenten werden von der Festplatte entfernt.
- Eure Einstellungen im Dokumente - Ordner werden nicht entfernt. So kann man MidiKey2key mit den alten Einstellungen wieder benutzen, wenn man es wünscht
- Wenn die Einstellungen auch entfernt werden sollen, einfach den "MidiKey2Key" - Ordner in "Dokumente" löschen.
First start/connecting to MIDI and listening to MIDI-input
- Connect a Midi-device to your PC (USB-device or Midi-device connected to a Midi-interface).
- Open MidiKey2Key from your start-menu.
- Note: Some Midi-devices or -interfaces require a windows-driver to be installed.
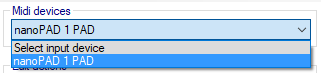
- Select your Midi-device under "Midi devices":
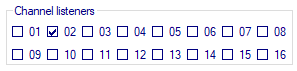
- Note: If you have more than one Midi-device connected to your input, you can filter-out MIDI-channels which your Midi-device is not using by unchecking the corresponding checkboxes under "Channel listeners" before You click on "Start". If you have only one Midi-device connetcted, normally this is not needed.:
- Click on the checkbox "Log To Window" and "Start":

- Do some actions on your Midi-device.
- Check the Log-window:
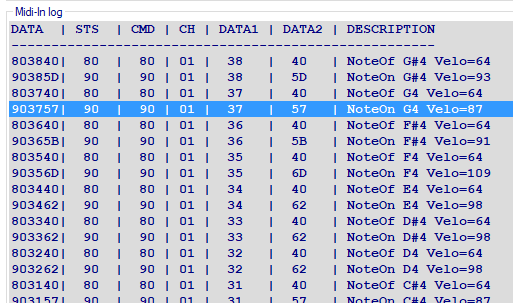
Every time a Midi-event is sent by your Midi-device, a new line appears at the top of the list.
The column "DESCRIPTION" shows, what kind the Midi-event was and which additional data were received.
There are different main-types of Midi-events, the best to use for us are "NoteOn" or "ProgramChange". Every Midi-event consists of a type (i.e. "NoteOn"), a Midi-channel (i.e. "01") and two Data numbers (columns DATA1 and DATA2).
In case of NoteOn or NoteOff the first DATA-value represents the key you played on your keyboard/pad and the second is the velocity - which is the speed you played the key (or released it).
In case of a ProgramChange-event, the two DATA-values hold i.e. the bank and patch number you changed to on your Midi-device.
Although you can use any kind of Midi-event,"NoteOn" or "ProgramChange" will be the most useful types. To use a "NoteOn"-event, find the line in the log which show the key you want to assign an action to and doubleclick it. A new window opens:
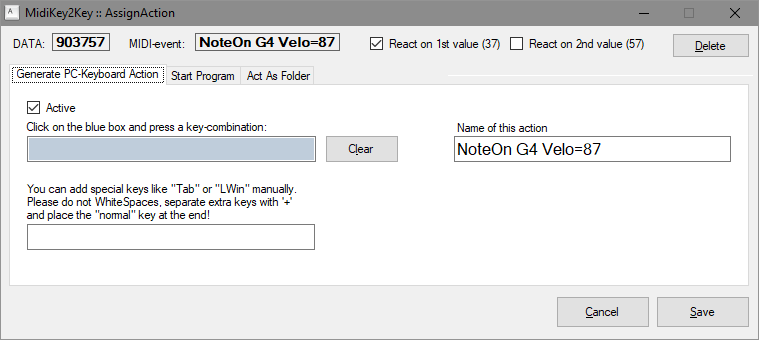
With this dialogue you can assign an action to the Midi-event which is described in the next block.
Eine Action zuweisen
- The AssignAction-window shows the details of the midi-event on top. In our example the DATA-field shows 903757.
This is a hexadecimal code consisting of 3 values:
90 represents the type of Midi-event (NoteOn") and the Midi-channel it was received on (a NoteOn event on channel 2 would have an different value than 90).
37 represents the key "G4" that was played.
57 represents in hexadecimal the velocity, the G4 key was played, which is 87 in decimal notation.
You have 4 choices for reacting on a midi-event:- Reacting on none of the DATA-values (not recommended for NoteOn. It would trigger the action on all NoteOn-events of any key)
- Reacting on exactly both of the DATA-values together (not recommended for NoteOn. It would trigger the action only in case you hit the key again with the exact same velocity)
- Reacting on the first DATA-value only (recommended for NoteOn. It will trigger the action when the key is played with any velocity
- Reacting on the second DATA-value only (Not recommended for NoteOn. It will trigger the action from any key but only played with exact the same velocity)
There could be other scenarios where listening to both or only to the 2nd value would lead you to your goal (i.e. using ProgramChange-events). It is up tp you and your creativity, to filter out Midi-actions, that fit your needs.
Reacting on first and/or second DATA-value is choosen by the the two checkboxes on top:

- Assign an action:
In the current release of MidiKey2Key (v1.6) there are 2 actions which can be assigned to a Midi-event:
"Generate PC-Keyboard Action" and "Start Program".
You can assign one of these actions or even both to a single Midi-event. Plus you can grab the same Midi-event again and create additional actions to this Midi-event.
Assigning a PC-keyboard Action
- Choose the tab "Generate PC-Keyboard Action".
- Set the "Active"-checkbox to "active" if not alreday.
- Click the blue input-field.
- Press a combination of keys on your PC-keyboard (i.e. Ctrl-Alt-A) and release it again.
- The key-combination is shown in the blue field and in the lower white field (which shows the action how it is stored).
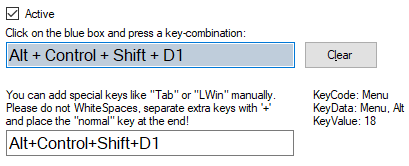
Note: In this example the number-key "1" on the main PC-keyboard was pressed. This is represenetd as "D1". To assign manually number-keys in the white field, use "D0" up to "D9" for the main-keyboard and "NumPad0" up to "Numpad9" for the numpad-number-keys. - You can edit the white field to add more special keys (like "Tab" for the tabulator-key or "LWin" for the left Windows-key). Make sure, you don`t use whitespaces, connect all keynames with a "+" and end with the "normal" key, that triggers the action.
- Set a fixed keyboard delay (default: 100ms) for the release of the virtual key-press or use the "Wait for NoteOff"-checkbox to release the virtual key-press after releasing the Midi-pad (works on NoteOn-events only).
- Click "Save".
- Note: Remember to set a hotkey for the function in the application you want to trigger to the same hotkey you just programmed.
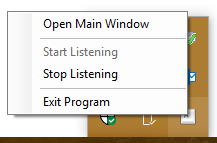
- Your hotkey triggered by your Midi-event should work now. You can click on the minimize-button of MidiKey2Key which will minimize it to the system-tray.
You can call its main-window, start/stop the listening to Midi or close it by opening its context-menu with the right mouse-button:
Assigning a "Start Program" Action
You can assign a "Start Program"-action in addition to a assigned keyboard-action or as the only action that is assigned to your Midi-event.
Both tabs do have a checkbox called "Active" to set the assignement-types active/inactive.
To assign a "Start Program"-action:- Choose the tab "Start program".
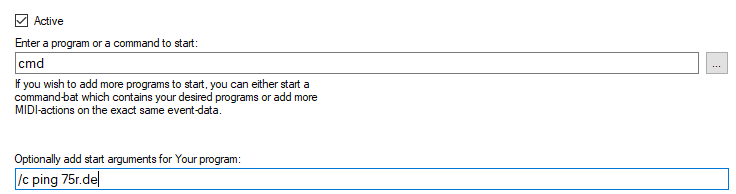
- Set the "Active"-checkbox to "active" if it is not already active.

- You can type in the complete path to an application plus the name of the excutable into the upper field or use the "..."-button to navigate your computer´s file-system.
Note: System programs which reside in the windows- or system directory (i.e. notepad.exe) do not require their full path. Just type in their name.
If you type in the program path and -name manually and the path contains whitespaces, surround everything with "". Using the "..."-button does this automatically.
You can start any executable file ending with ".exe" or ".com", script-files ending i.e. with ".bat" or ".cmd" or type in a file that is connected to an application, like a MS Word document ending on ".docx".
You can optionally add start-arguments for your application in the lower input-field. Here is an example using the command-shell "cmd.exe" to ping an internet-server:
- When you are done, click "Save".
- MidiKey2Key is ready to work and can be minimized to tray as described above.
The Train Simulator features are still coming to be explained here (like a german version of this...sorry). So far check out the video-tutorials on YouTube for this.
There is another tab called "Act As Folder" which is yet not working. It is intendet to let your Midi-event act like opening/closing a folder that contains different actions on Midi-events which are already assigned to actions. This would let you i.e. assign more different events to a limited ammount of existing keypads (like a small Midi-pad has).
An additional type of action could be a complex chain of mouse- and keyboard commands. You could call it a "macro" that could be fired by a Midi-event.
If these ideas will appear in future-release of MidiKey2Key depends on your feedback.
Tell me, what you would like to see as a new feature.
Edit, delete and test Actions
You can edit or delete existing actions:
You can edit test actions without using Your Midi-device:
- Click on the dropdown "Edit actions".
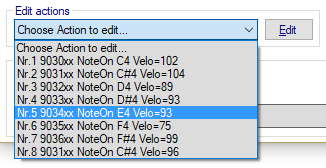
- Identify the action you want to edit or delete and click on it.
- Click "Edit".
- A new window opens and shows the details of your action:
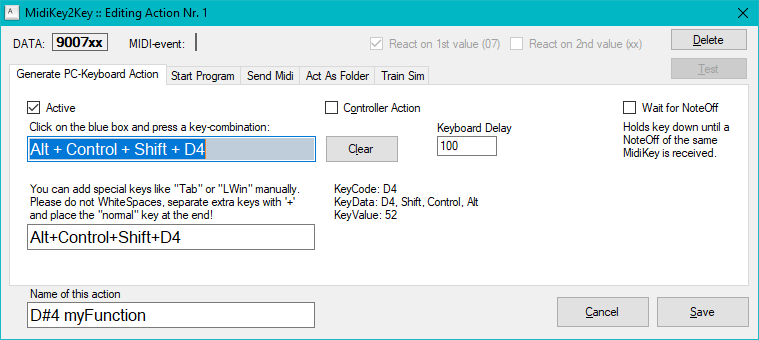
- This dialogue works exactly like the one to assign new actions to a new event, which you know already.
- In this dialogue you can
- change the key-command by clicking into the blue input-field,
- change the key-command by editing the white input-field,
- add a second key-command, that will executed alternating to the first commandby using the 'controller Action' checkbox,
- deaktivate the key-command and change over to assign a 'Start Program'-action,
- add a 'Start Program'-action, to the existing key-command,
- add a 'Send Midi'-action, to the existing key-command, to control Your Midi-devices LEDs
- add 'Train Simulator'-actions, to the existing key-command,
- set a fixed delay for releasing the key-command,or
- set 'Wait for NoteOff' to wait for the release of the Midi-button,
- give Your action a name, to find it quicker in the "Edit actions"-dropdown,
- delete the action at all.
- To edit or add assignments use the dialogue as you know already and click "Save" when you are done.
- Note: You can not change the settings to react on the 1st or 2nd DATA-value on an existing action. To do so, pick a new Midi-event from the log-window while generating the desired Midi-event with your Midi-device.
- To delete the action click "Delete" in the upper right corner.
You can edit test actions without using Your Midi-device:
- The "Assign Action" or "Edit Action" window must be closed.
- Make sure that listening to Midi is started (Start/Stop-button).
- Use the "Test"-button to trigger the in the dropdown selected action(s) without using Your Midi-device.
Additional features
Working with multiple settings
If MidiKey2Key is startet without parameters a default "settings.ini" is loaded and used to store Your changes.
You can save additional setting-files by using the "Save As..." - command from the the File-menu. All Your settings can be stored in the "My Documents\MidiKey2Key"-folder but do not have to. Any path is allowed.
To create a new setting, just use the "New" entry from the "File"-menu and give Your settings file a path and a name.
When no special setting-file is loaded the title-bar of the programm just shows "MIDIKey2Key vX.X.X.X and nothing else. If a different setting-file is loaded, it shows the name of the setting in addition:

All changes that You do, are stored in this file. Therefore use "Save As..." to have the new setting-name in the title-bar and then add or change your actions.
A different setting-file can be loaded by using "Load Custom..." from the File-menu or start MidiKey2Key.exe with a path and setting-file-name. For example: "Path-To-Program\Midikey2Key.exe" "c:\Users\Ben\Documents\MidiKey2Key\NewGamingSetting.ini"
So it is possible to create a simple shell-script (.bat or .cmd) that starts MidiKey2Key with a special setting. To start automatically other programs, use the built-in STARTUP action.
For a lot more easy creation of a shortcut to MidiKey2Key, that starts with a certain setting, You can use the "Save Shortcut..."-command from the File-menu.
Just choose a new name of Your choice ("MidiKey2Key - " is the default, You can add a settings-name freely, or change it completely to antyhing), choose a directory (Your desktop is the first choice of the program) and click "Save".
The File-menu in overview
There are some more additional features:
VB-Script-SDK for advanced programming
To let a single Midi-Pad trigger a program and the next time, You press it again to trigger another program or stop the first one, there is a VB-script example in the download-section.
Normally MidiKeyKey can only perform one program-action on one Midi-Key and another on a 2nd Midi-Key. In the given example everytime the same single script is executed.
It remembers it´s last state. The example can be used to play a sound-file in the background via VLC and stops VLC when executed again. This saves Midi-Pads and can be used to trigger a bunch of different sound-files, since the script takes the path/name of the soundfile to be played as an argument.
Possibly coming features
Thinking about this...
If MidiKey2Key is startet without parameters a default "settings.ini" is loaded and used to store Your changes.
You can save additional setting-files by using the "Save As..." - command from the the File-menu. All Your settings can be stored in the "My Documents\MidiKey2Key"-folder but do not have to. Any path is allowed.
To create a new setting, just use the "New" entry from the "File"-menu and give Your settings file a path and a name.
When no special setting-file is loaded the title-bar of the programm just shows "MIDIKey2Key vX.X.X.X and nothing else. If a different setting-file is loaded, it shows the name of the setting in addition:
All changes that You do, are stored in this file. Therefore use "Save As..." to have the new setting-name in the title-bar and then add or change your actions.
A different setting-file can be loaded by using "Load Custom..." from the File-menu or start MidiKey2Key.exe with a path and setting-file-name. For example: "Path-To-Program\Midikey2Key.exe" "c:\Users\Ben\Documents\MidiKey2Key\NewGamingSetting.ini"
So it is possible to create a simple shell-script (.bat or .cmd) that starts MidiKey2Key with a special setting. To start automatically other programs, use the built-in STARTUP action.
For a lot more easy creation of a shortcut to MidiKey2Key, that starts with a certain setting, You can use the "Save Shortcut..."-command from the File-menu.
Just choose a new name of Your choice ("MidiKey2Key - " is the default, You can add a settings-name freely, or change it completely to antyhing), choose a directory (Your desktop is the first choice of the program) and click "Save".
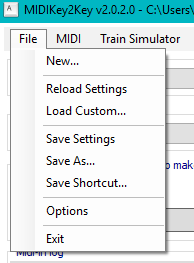
The File-menu in overview
- New wants to have a path/name of a new settings-file and creates a new blank action collection. Recommended to start.
- Reload Settings reloads the current settings (named in the title-bar or just settings.ini)
- Load Custom... lets You open a different setting-file
- Save Settings saves Your current settings in the setting-file named in the title-bar or just in settings.ini
- Save As... lets You choose a new setting file to save into
- SaveShortcut... creates a shortcut to MidiKey2Key to startup with the actual settings-file
- Optionsopens a dialogue with general program-settings like "autostart listening", ...
- Exit exits the program.
There are some more additional features:
- From the menu "MIDI" and from the context-menu in the system-tray you can start and stop the listening to the MIDI-input.
Stopping the listening stops the reactions on incoming Midi-events. These menu-buttons act the same as the Start/Stop-button. - You will need to stop listening first for changing the Monitor settings, which are:
- "Listen to SysEx": This shows SysEx-Midi-events which are not all following the general Midi-rules. Manufacturers of Midi-equipment can use these events to send longer data, to send setup-data of device-settings or i.e. sample-data. The ability to switch them on is experimental only. Wether a useful result will be generated, will vary much from case to case.
- "Log to file" writes down all incoming Midi-events into a logfile. You can choose the filename by using the button "...".
- There are some more options to set in the options-dialogue (Menu File-Options):

- "Autostart listing": If You check this checkbox, MidiKey2Key will start listening automatically the next time when it is started.
- "Minimize to tray when autostarted": Let´s start MidiKey2Key in the tray in the background (if "Autostart listing" is checked too).
- "Mirror Midi": Mirrors the received Midi-commands back to Your Midi-device if needed.
- "Confirmation after saving action": Enables/disables the confirmation of storing the action after saving/editing an action.
VB-Script-SDK for advanced programming
To let a single Midi-Pad trigger a program and the next time, You press it again to trigger another program or stop the first one, there is a VB-script example in the download-section.
Normally MidiKeyKey can only perform one program-action on one Midi-Key and another on a 2nd Midi-Key. In the given example everytime the same single script is executed.
It remembers it´s last state. The example can be used to play a sound-file in the background via VLC and stops VLC when executed again. This saves Midi-Pads and can be used to trigger a bunch of different sound-files, since the script takes the path/name of the soundfile to be played as an argument.
Possibly coming features
Thinking about this...
FAQ
My action is performed twice, when I send a Midi-Note
This happens with MIDI-controllers like the Novation Launchpad which do not send a Note-Off when releasing the pad, but send a Note-On with a velocity of 0.
Solution: For devices that send at NoteOn a fixed velocity of 127 and a Note-On with a velocity of 0 when releasing the pad.
Select a NoteOn - event and check "React on 2nd value (xx)". So the action is triggered only, when a Note-On with velo=127 is received.
For devices that send a variable velocity with Note-On but a Note-On with velocity of 0 instead a Note-Off, You can also use "React on 2nd value (xx)" but choose the velocity of 0, so the action is triggered, when releasing Your button.
Midikey2Key does not start anymore after a Win 11 update
Unpack this wdmaud2.drv into Your MidiKey2Key directory and try again.
I get an error-message when using 'Help' - 'Check for Update'
This is a known bug which might only affect version 2.3.5.0. Just go to the Download-page of the Midikey2key Homepage and check, if there is a newer version.
My game/app is not responding on key-actions, but OBS does
Keep in mind, that "normal" programs are responding only, when they are in foreground.
Some programs - like OBS - are capable of responding on global hotkeys. Wether they are in focus or not. This affects not the most apps!
Specially games do read the keyboard in a different way than most of desktop apps do. If Your game/app has another way of reading key-presses, MidiKey2Key's keypresses are not recognized so far. There is another way of sending keystrokes to be fully implemented into MidiKey2Key, but this means a lot of work and would possibly fix all of these problems.
Wait for future updates...
In the meantime You can perform keyboard-events by using the little helper-app SendKey, which can address the app You send keypresses to or wait for this app`s start first.
You can trigger it with a program-start-action plus arguments.
Check it out at the download-page under "other tools/files"
When another MIDI-program is running, MidiKey2Key crashes with the error-message 'There is not enough memory available'
This is not related to Your system's memory. It is a misleaded windows error message. It occurs because window's MIDI driver is not multi-device-capable. You can use other MIDI software besides MidiKey2Key sharing the same MIDI-input by using a virtual MIDI-port:
Download Tobias Erichsen's loopMIDI here, install and run it.
You can add one or more virtual MIDI loop ports which appear as inputs and outputs in every Windows MIDI application. Choose a virtual loop-port as output-device in MidiKey2Key and activate 'Mirror MIDI' in the MidiKey2Key options. In Your other MIDI-App choose the loopMIDI port as input. You can use multiple instances of MidiKey2Key.
When MidiKey2Key is in focus, OBS switches scenes correctly. When Midikey2Key looses focus, it does no longer
(Or similar: When the target-app is not longer in focus even it can handle global key commands) In normal cases it is not needed, to run MidiKey2Key as administrator. But if Your target-app runs as administrator, MidiKey2Key only can send keystrokes to it when running as administrator too. Try this when having such issues.
Can I control volume-settings of OBS with MidiKey2Key?
Unfortunately OBS does not have hotkeys for volume-control so far. So MidiKey2Key cannot help. :(
Some special Keys can not be triggered
This is true. The API, MidiKey2Key uses to send keystrokes is limited to common key(-combinations), that Windows is able to use as hotkeys. No alternating keys, like Shift, Alt or Control alone can perfom an action and other special keys.
Luckily the multimedia-keys (that some PC-keyboards have) work!
There is a problem with "Wait for NoteOff" in my game/app
...that causes, the hotkey is only send once, but does not repeat, (it looks like).
Actually when using Notepad for testing a held MIDIkey, a letter will not be repeated. Using MidiKey2Key for controlling games like pinball, You should see, that the triggers should be held until You release the MIDI-key.
From version 2.3.5.0 this should work with devices, which send a velocity of 0 instead of NoteOff messages.
See also "My game/app is not responding on key-actions, but...". Specially games are very different in reading keyboard-input. So far MidiKey2Key acts as a standard Windows-app.
It is possible that there are games or apps that do not respond to MidiKey2Key's Keyboard-actions. Sorry so far.